Introduction
Most people start the year full of good intentions, yet only a small fraction stay on track with their goals by spring. The pattern is simple. Without a clear plan and visible reminders, even serious goals fade into the background. Workplace safety works the same way. If first aid kit signage is not clear and visible, even a strong safety policy can fail when it matters most.
According to the Bureau of Labor Statistics, U.S. workplaces report over 2.8 million nonfatal injuries each year, and research shows that effective safety measures, including proper signage systems, play a critical role in injury prevention and response. In many of those cases, response time is the difference between a quick recovery and a long absence. A well‑stocked first aid kit helps only if people can see it and reach it within seconds, which is where effective first aid signs come in.
“The first minutes after an injury are often the most important.” — National Safety Council
For operations managers, facility managers, safety officers, and business owners, first aid kit signage sits at the meeting point of legal compliance and real‑world protection for teams. OSHA uses broad language about “readily accessible” first aid, while ANSI gives the technical details for signs and kit contents. Together, these rules guide how you design, place, and maintain signs that lead people to help fast.
In this guide, you will see how OSHA requirements and ANSI standards work together, which design elements matter most, where to install signs, and how to pick the right materials for each environment. You will also see how printable first aid kit signage fits into the picture, and where it falls short. By the end, you will have a clear, practical checklist to bring your facilities in line with first aid kit signage requirements and give your people a better chance in any emergency.
Key Takeaways
OSHA 1910.151(b) and the general duty clause require first aid that is easy to reach, and clear first aid kit signage is one of the most direct ways to support that requirement.
ANSI Z535.4 explains how safety signs should look, while ANSI Z308.1 sets minimum first aid kit contents, so your signage and your kits work as a matched system.
Effective first aid signs use a green background, a white cross, high‑contrast text, and concise wording so anyone can spot and understand them quickly.
Strategic placement matters as much as design, with signs in the direct line of sight, visible from several angles, and supported by floor and overhead markers where needed.
Sign materials should match the environment, from basic indoor labels to aluminum, fiberglass, or photoluminescent signs for harsh or low‑light areas.
Poor or missing signage can lead to OSHA citations, higher fines, and more legal risk if an injury case reaches investigators or the courts.
Understanding OSHA Requirements For First Aid Kit Signage
OSHA does not publish one short rule that says you must hang a specific first aid sign above every kit. Instead, the requirement comes from several parts of the standards that work together.
The starting point is the general duty clause in Section 5(a)(1) of the Occupational Safety and Health Act. It states that employers must provide a workplace free from recognized hazards that are likely to cause death or serious harm. If someone is badly hurt and no one can find a first aid kit fast, that is a clear, recognized hazard in the eyes of an inspector.
Standard 1910.151(b) adds more detail: “adequate first aid supplies shall be readily available.” Readily available does not just mean that a kit exists somewhere in the building. It means workers can get to it quickly, without confusion, even under stress. OSHA letters of interpretation and inspection practices show that clear first aid kit signage is one of the main ways employers show that supplies are truly accessible.
OSHA also expects you to keep workers informed about safety resources through training and clear markings for first aid and emergency gear, and research on workplace communication confirms that visual safety information systems significantly improve emergency response outcomes. During an inspection, obvious, consistent signage supports your case that employees know where to go when something happens. Photos of signage often appear in inspection reports as proof of either good practice or failure.
Industry‑specific standards add context. For construction, OSHA 1926.50 covers first aid and medical attention. Maritime operations follow 1915.87, which also focuses on quick access to first aid. While these sections do not spell out exact sign sizes, inspectors across all these fields look for fast, visible access.
Voluntary standards like ANSI are not law by themselves, but OSHA often points to them as recognized good practice. If your first aid kit signs follow ANSI color, wording, and symbol rules, you are in a stronger position to show good faith. If they do not, you face a higher risk of serious, repeat, or willful citations.
ANSI Standards For Safety Sign Design And First Aid Identification

Where OSHA explains what must be achieved, ANSI explains how to design signs that help you do it. For first aid kit signage, two standards matter most: ANSI Z535.4 and ANSI Z308.1.
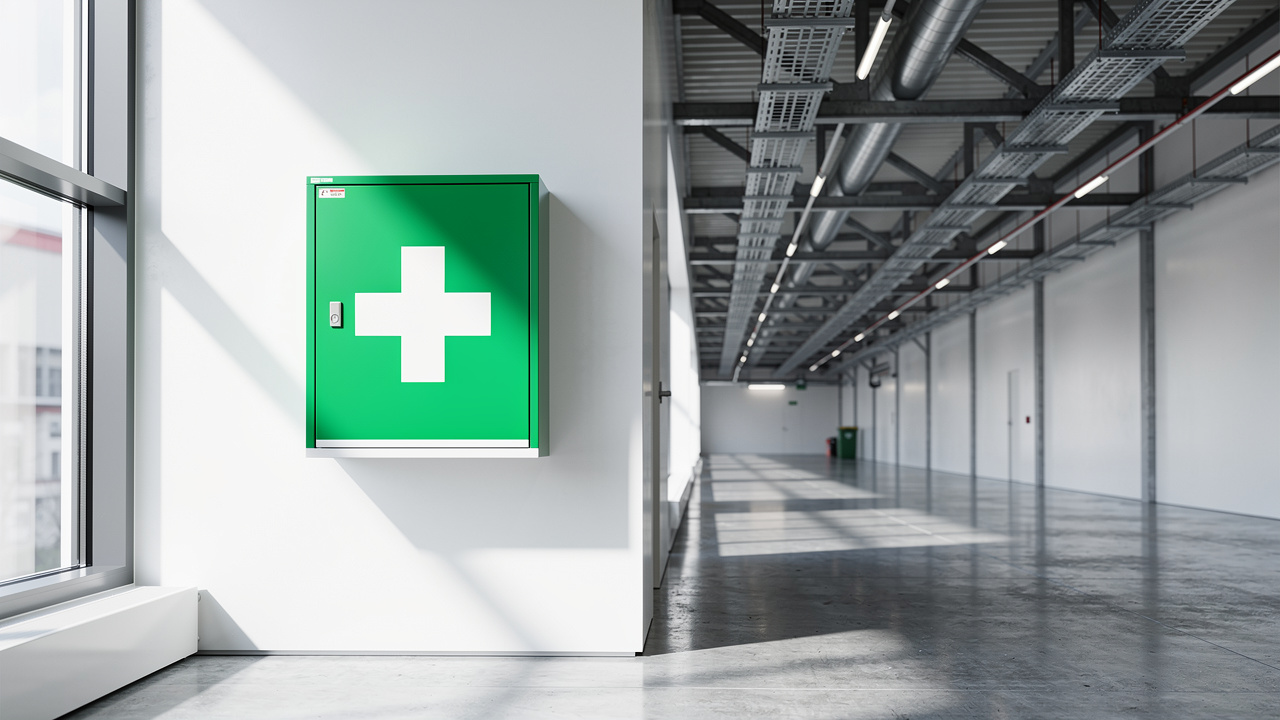
ANSI Z535.4 is the main reference for safety sign design in the United States. It sets out color codes, symbol use, and general layout so that workers see consistent patterns from site to site. In this system, green is the color for safety information and safe conditions, including the locations of first aid equipment. When your first aid kit signage follows this color rule, employees and visitors can scan for green signs when they need help.
The universal first aid symbol under ANSI and related standards is a white cross on a green background. This symbol is recognized in many countries and aligns with ISO 3864, which handles safety colors and signs internationally. For companies with multiple sites or global operations, this shared symbol means employees can move between locations without relearning what first aid signs look like.
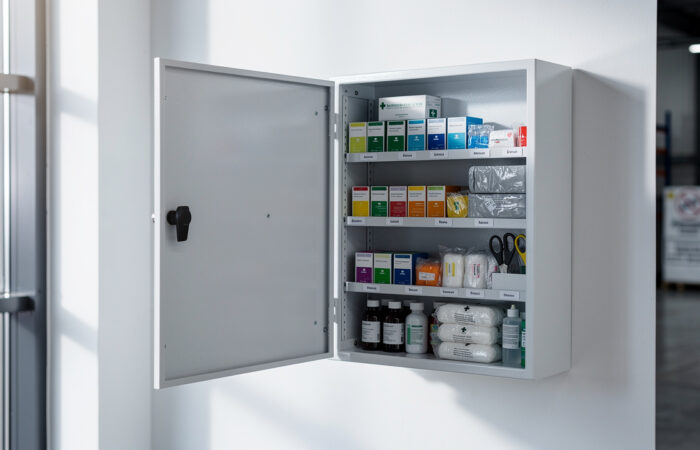
ANSI Z308.1 focuses on the kits themselves. It defines different classes of first aid kits and what must be inside each one. While it does not require first aid signs directly, it assumes that kits are visible and clearly identified. Using signage to mark kits that meet ANSI Z308.1 helps you show that stations are both visible and properly stocked.
The Z535 series also describes signal words such as DANGER, WARNING, CAUTION, and NOTICE. For most first aid kit signage, strong hazard signal words are not needed, because the sign marks a safe place rather than a source of danger. In some cases, NOTICE may apply for signs that combine information about first aid access and housekeeping, such as “First Aid Station – Keep Area Clear.”
Readability rules in ANSI cover text size, font style, and viewing distance. A common rule is that each inch of text height should cover about fifty feet of viewing distance under good lighting. Simple, sans serif fonts such as Arial or Helvetica work best, because they stay clear at a distance and at small sizes. High contrast between text and background is required, which is why white on green is more than just a style choice.
ANSI also encourages the use of pictograms. In many cases, a symbol can stand on its own, especially when backed by training. In mixed‑language workplaces, pairing the white cross symbol with brief English and Spanish text is often the most practical choice. For multinational firms, aligning ANSI design with ISO 3864 pictogram rules keeps first aid kit signage consistent across borders.
Essential Design Elements Of Compliant First Aid Kit Signage
Once you know what OSHA expects and how ANSI defines safety signs, the next step is to design first aid kit signage that fits those rules and your site.
Key design elements include:
Color: Use a green background with white text and symbols. Green signals safety and help, and the contrast stands out in busy areas. Use the same color scheme across all locations for fast recognition.
Symbol: The main symbol is a white cross or plus sign. Place it in a prominent spot on the sign, with clear wording such as “First Aid Kit” or “First Aid Station” nearby.
Text: Keep wording short and direct: “First Aid Kit,” “First Aid Station,” or “First Aid Inside.” Short phrases read faster and stay legible when printed in two languages.
Contrast and Font: Use high contrast (white on green) and a simple sans serif font. This combination helps people read the sign from across a warehouse or down a corridor.
Size: Follow the rule of about 1 inch of letter height for every 50 feet of viewing distance. Small offices may be fine with a 5″ × 7″ sign; large plants often need 10″ × 14″ or larger.
Bilingual Text And Arrows: Where many workers speak Spanish or other languages, add wording such as “Botiquín De Primeros Auxilios” under “First Aid Kit,” and use clear arrows when the kit is not directly under the sign.
Layout And Extras: A simple border can help the sign stand out, but avoid clutter. Photoluminescent backgrounds or text are very helpful in low‑light conditions or during power loss.
Types Of First Aid Kit Signage By Format And Application
Different facilities need different styles of first aid kit signage. A quiet office might rely on a single wall sign, while a loud manufacturing floor may need overhead, wall, and floor markings working together.
Wall-Mounted Signs And Adhesive Labels
Wall‑mounted signs are the classic way to mark first aid kit locations. In offices or break rooms, a basic rigid sign above the kit usually gives enough visibility, especially when placed near normal traffic paths.
Typical uses:
Small labels (around 3.5″ × 5″) on cabinet doors or right next to the kit
Larger panels (around 10″ × 14″) in hallways, shop floors, or aisles
Adhesive polyester labels can go directly on first aid boxes, locker doors, or storage cabinets. Magnetic labels are helpful on metal surfaces when layouts change often.
Mounting height matters. Aim for the center of the sign to sit roughly 60–80 inches above the floor so it is near eye level and above common obstacles.
Projecting And Multi-Directional Signs
Flat signs lose impact when people move along a hallway or between tall shelving rows. Projecting and multi‑directional signs fix that problem by sticking out into the line of travel.
Two‑way V‑shaped signs provide visibility from both sides of a corridor and work well in long hallways or side passages.
Three‑way panoramic signs offer a third face for better coverage at intersections or in large open areas.
Mounted above eye level, these signs help people see first aid locations even when racks or equipment block lower walls. In busy settings with forklifts and carts, projecting signs often outperform flat panels.
Ceiling-Mounted And Overhead Signs
In many warehouses, logistics centers, and large retail spaces, wall space is crowded or blocked by tall shelving. Ceiling‑mounted and overhead signs solve this by hanging above the work area.
Drop‑ceiling “Z” signs fit into grid ceilings and provide two‑sided visibility along an aisle.
Hanging signs mounted to steel beams or roof structures can sit high enough to clear machinery and cranes.
When marked with a bright green panel and white cross, overhead signs act as strong visual markers that draw people toward the nearest first aid station. Installation must account for weight, vibration, and fire code rules, and must not block sprinklers or emergency lighting.
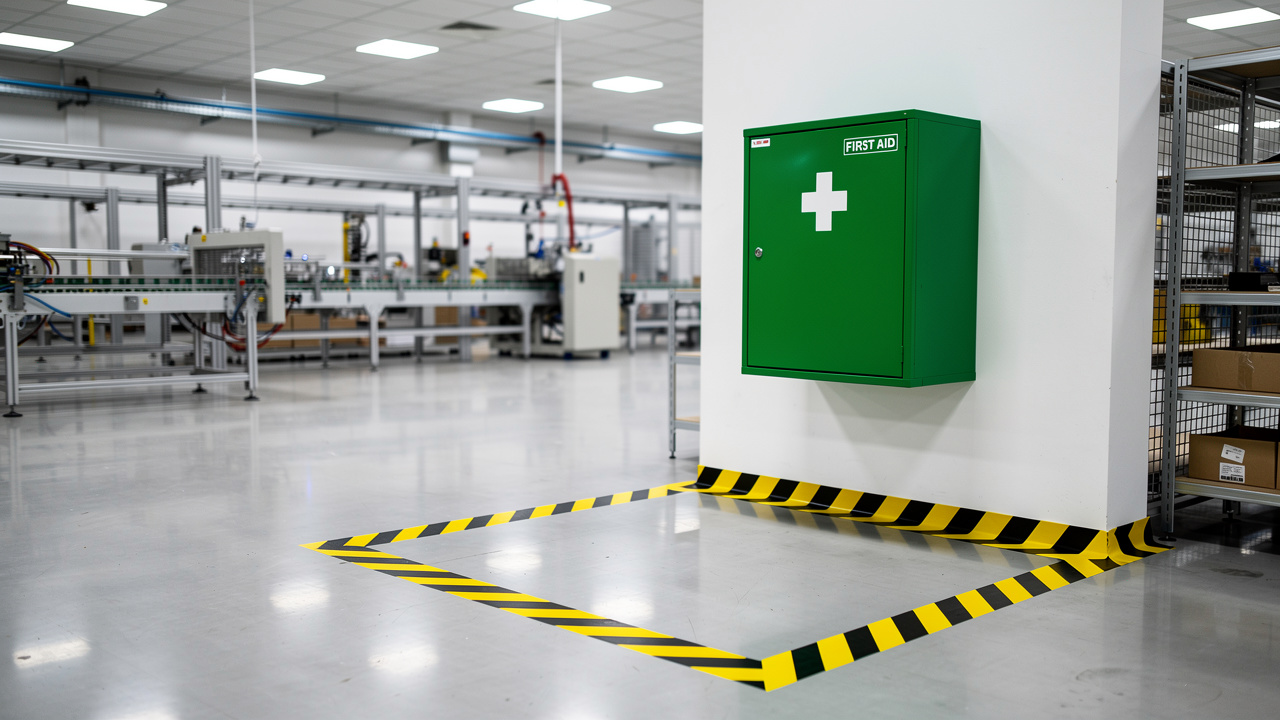
Floor Signs And Area Marking Systems
Floor signs serve two purposes: they mark where the first aid station is and help keep that area clear.
Common options include:
Anti‑slip floor decals with a green background and white cross
Floor marking tape systems that frame a “keep clear” box around the first aid station, often with text such as “First Aid – Keep Area Clear”
Because floor graphics sit where traffic is heaviest, durability is key. Choose materials that can handle foot traffic, pallet jacks, and forklifts, and set a schedule to inspect and replace worn graphics.
Selecting Materials Based On Environmental Conditions
Picking the right words and symbols is only half the job. First aid signs also need to survive the environment where you place them.
Start by asking:
Is the sign indoors or outdoors?
Is the air climate‑controlled or exposed to heat, cold, or moisture?
Are there chemicals, steam, or dust nearby?
Will people or equipment bump the sign often?
Answers to these questions guide material choices:
Adhesive polyester labels – Good for indoor offices, schools, and retail sites. They stick to smooth surfaces and stand up to light cleaning and normal wear.
Aluminum signs – Work well indoors and outdoors, resist rust, and handle sunlight and temperature swings. Ideal for docks, outdoor yards, and exposed areas.
Fiberglass signs – Handle strong chemicals, steam, and heat, making them suitable for chemical plants, refineries, and harsh manufacturing lines.
Rigid plastics (PVC or acrylic) – Budget‑friendly for indoor walls and projecting signs; many panoramic first aid signs use acrylic.
Photoluminescent vinyl or aluminum – Absorb light and glow when power fails, useful in stairwells, basements, and interior rooms without windows.
Magnetic backing – Allows movable markers on metal surfaces where racks or bins relocate often.
A simple planning table:
Environment Type | Recommended Materials | Key Considerations |
|---|---|---|
Indoor office or school | Adhesive polyester labels, rigid plastic signs | Low impact, minimal chemicals, focus on clarity and cost |
Outdoor yard or dock | Aluminum signs, fiberglass panels | Weather, UV light, possible vehicle impact |
Chemical or heavy industrial | Fiberglass, high‑grade aluminum, photoluminescent options | Chemicals, heat, steam, long service life |
Warehouse or logistics center | Acrylic projecting signs, overhead panels, anti‑slip floor graphics, magnetic labels | Tall racking, moving inventory, forklift traffic, changing layouts |
Balancing material strength, cost, and expected lifespan helps you avoid early failures that could weaken your safety program.
Strategic Placement Guidelines For Maximum Visibility

Even the best‑designed first aid kit signs fail if people cannot see them fast, as studies on safety signage effectiveness demonstrate that visibility and strategic placement are critical factors in emergency response success. Placement connects safety theory with daily work patterns.
Key placement rules:
Sign at the source: Each first aid kit or station needs a sign on or directly above the cabinet, box, or closet that holds the kit. If someone reaches the sign, they should reach the supplies.
Line of sight: Walk through each department as your workers do. From machines, desks, or picking zones, at least one first aid sign should be visible. If not, add wall, projecting, or overhead signs.
Height: Mount signs with the center roughly 60–80 inches off the floor to keep them close to eye level and above common obstacles.
Size vs. distance: Use about 1 inch of letter height per 50 feet of viewing distance. Larger rooms and long corridors demand larger panels.
In corridors and aisles, projecting signs often work better than flat ones. Placing two‑way projecting signs every 50–100 feet keeps at least one sign in view. Three‑way signs at intersections help from multiple approach angles.
Large open areas (warehouses, gym floors) need a mix of overhead and floor‑level markings. Overhead signs direct people from across the space, while floor decals or taped zones show the exact location and help keep access clear. Many companies use a three‑foot keep‑clear radius around first aid stations.
Directional signs with arrows should guide people from high‑traffic points such as break rooms, time clocks, or main doors to the nearest first aid station. Each directional sign should be visible from the last one so workers never reach a dead end. In dim or enclosed areas, use extra lighting or photoluminescent signs, and keep dated photos of installed signs for your safety records.
Directional And Wayfinding Signage Systems
Point‑of‑use signage is vital, but larger or more complex buildings also need a wayfinding system that guides people step by step.
Think in terms of decision points: any place where someone must choose between two or more paths, such as:
Hallway intersections
Stairwell exits
Department entrances
Lobby and corridor doors
At each decision point, a directional sign should point clearly toward the nearest first aid station.
Keep arrow use consistent:
Up arrow – straight ahead
Down arrow – here / on this wall
Left / right arrows – turns
From any directional sign, people should already see the next one in the sequence. In long corridors, you may place several directional panels that keep reinforcing the path to first aid.
For large sites, adding distance or time estimates such as “First Aid Kit – 50 Feet Ahead” reduces doubt, especially for visitors. Many facilities divide space into zones, each with its own main first aid station. Zone markers on walls and maps make it easier for staff and contractors to learn where they are and which station serves their area.
Color‑coding can support wayfinding without breaking ANSI rules. Keep green as the base color for first aid, and use subtle zone colors on borders or secondary elements.
Good planning links first aid wayfinding with emergency exit routes. During a fire or evacuation, someone might still need quick treatment for cuts, burns, or smoke exposure. Regular drills and timed tests with new employees often reveal gaps that are not obvious on a floor plan.
Signage For Specialized First Aid And Emergency Equipment
Standard kits cover common cuts, burns, and minor injuries, but many workplaces also use specialized emergency equipment that needs its own clear signage.
Key items include:
Automated external defibrillators (AEDs): Signs usually show a heart with a lightning bolt, often using green to match other lifesaving tools. Many states issue guidance for AED placement in lobbies, fitness areas, and near main stairs.
Emergency eyewash and safety shower stations: Required under OSHA 1910.151(c) where corrosives or eye hazards exist. Signs often show an eye or shower symbol in green and white. They must be visible from the nearby work area, and stations must be within a short walking time from the hazard.
Trauma and bleeding control kits: Used in higher‑risk environments such as manufacturing plants, security operations, and event venues. Clear signs that say “Trauma Kit” or “Bleeding Control Kit” help trained staff find the right supplies quickly.
Spill kits: Hold absorbents and tools for chemical or oil spills. While not first aid devices, spill kit signs often sit near first aid panels, since both relate to emergency response.
Some sites also carry emergency oxygen, asthma inhaler kits, allergy medication stations, or canine first aid kits. These stations should have consistent, readable signs so responders can find them at a glance.
Emergency communication tools phones, intercoms, or call buttons often sit close to first aid and AED stations. Combined signage that shows both the first aid symbol and a simple phone or bell icon tells people they can treat injuries and call for extra help from the same location.
Personnel Identification Hard Hat Stickers And Training Indicators
Knowing where the first aid kit sits is one part of a fast response. Knowing who has the skills to use it well is another.
In construction and heavy industry, hard hat stickers are common:
Decals with phrases such as “CPR First Aid Certified,” “CPR AED,” “First Responder,” or “Emergency Response Team”
Bright colors that stand out without affecting the hard hat’s protective rating under ANSI Z89.1
In offices, retail, hospitality, and healthcare where hard hats are rare, vests, badges, or uniform patches can serve the same role. A small green cross on a name badge or a colored armband can show that a person has current first aid and CPR training. Reflective material helps keep these markers visible during power loss or night work.
Some companies add training or expiration dates on these markers, either in small print or through color codes linked to certain years. A digital roster that lists trained staff by location and shift backs up the visual system, especially in large or multi‑site operations.
Replacing stickers or badges on a yearly cycle keeps the program fresh and aligned with training schedules. Linking updates to safety meetings or drills is a good way to remind everyone where first aid and AED signs are located.
Maintenance, Inspection, And Replacement Protocols
Once your first aid kit signage is installed, it still needs care. Signs age, walls change, and equipment moves. Without a simple maintenance plan, a clear system can fade over time.
Build a basic program around:
Regular inspection: Many facilities perform a quick monthly visual check. Supervisors confirm that every first aid sign is present, visible, and not blocked by shelves, posters, or stacked materials.
Deeper quarterly checks: Look for peeling edges, cracks in plastic panels, corrosion on metal signs, and fading colors. Photoluminescent signs need special attention, since dust or surface damage can reduce glow performance.
Replacement triggers: Replace signs when colors have faded significantly, when text can’t be read from the expected distance, or when there is any physical damage. Outdoor panels often need replacement after 3–5 years, while well‑placed indoor signs may last 5–10 years depending on material.
Safe cleaning: Use gentle cleaners that do not scratch surfaces or strip protective coatings. Avoid strong solvents unless the sign manufacturer approves them.
Whenever first aid kits move or new stations are added, update the signage at once. Old signs pointing to empty spots waste time during an emergency and send a poor message about safety.
Documenting inspections and replacements helps both safety management and OSHA interactions. Simple logs that list dates, findings, and actions taken show that you manage signage actively. Encourage employees to report missing or blocked signs so you can fix problems between inspection cycles.
Industry-Specific Signage Considerations And Best Practices
Core rules for first aid kit signage apply everywhere, but different industries face different challenges. Construction crews work outdoors and change locations often. Manufacturing plants deal with noise, dust, and chemicals. Warehouses handle tall storage and constant movement.
Construction Sites And Outdoor Work Environments

Construction sites combine weather exposure, moving trailers, and temporary setups. OSHA 1926.50 requires first aid on hand for construction work, and inspectors expect workers to find kits quickly even as the site changes.
Best practices include:
Weather‑resistant aluminum or fiberglass signs that handle rain, sun, and temperature swings
Laminated vinyl labels on job trailers, first aid boxes, and vehicle‑mounted kits
Portable sign stands and cone toppers that move as access points shift
Clear markers on site maps in the office, backed by visible signs in the field
Reflective surfaces improve visibility during early morning or night work when lighting is limited.
Manufacturing Plants And Industrial Facilities
Manufacturing plants often have heavy machinery, noise, dust, and chemical exposure. High columns, conveyor systems, and work in progress can block wall signs, so overhead and projecting signs play a larger role.
Recommendations:
Chemical‑resistant fiberglass or high‑grade aluminum signs near process lines with solvents or acids
Signs mounted higher on walls or support columns to protect them from splashes and forklift impact
Durable floor markings around first aid stations to keep access clear amid moving materials
Bilingual signage where many workers speak more than one language
Aligning first aid signage with broader safety sign standards (lockout/tagout, hazard labels) helps keep walls readable instead of confusing.
Warehouses, Logistics Centers, And Distribution Facilities
Warehouses and logistics centers often cover large areas with high ceilings and tall racking. Forklifts and order pickers move in tight lanes, and layouts change often.
Helpful practices:
Overhead ceiling signs near cross aisles and main travel paths, marked with green and white first aid symbols
Repeated smaller signs along long aisles to keep the message in view
Strong floor markings in front of first aid cabinets or wall boxes to prevent blocking with pallets or carts
Zone‑based signage where each zone has a main first aid station, shown on facility maps and supported by magnetic labels on racking
Good lighting and, where needed, reflective or photoluminescent accents support visibility during night shifts or in shadowed corners.
Creating A Comprehensive First Aid Signage Implementation Plan
Turning first aid kit signage requirements into a working system is easier when you follow a repeatable plan. Break the project into clear phases:
Current State Assessment
Walk every building and floor, list every first aid kit, station, and AED, and photograph existing signs. Note kits with no signs and signs that point to empty spaces.Regulatory Gap Analysis
Compare your findings against OSHA rules for accessible first aid and ANSI guidance on design and visibility. Rank each issue by risk so you know what to fix first.Map And Risk Review
Update floor plans to show first aid stations, AEDs, eyewash units, and key hazard areas. Check where people spend most of their time and where injuries are most likely.Signage Selection
Decide which locations need wall signs, projecting signs, ceiling markers, floor graphics, or a mix. Match materials to conditions using earlier guidance. This is a good time to coordinate with your first aid kit supplier; working with a partner like First Aid Longs, which understands OSHA and ANSI expectations, helps you align physical kits, labels, and signage as one system.Installation Planning
Choose low‑activity times, coordinate with maintenance staff, and gather safe mounting hardware for each surface.Employee Communication
Use safety meetings, email notices, and posters to show the new sign system, explain what the symbols mean, and remind teams where first aid and AEDs are located.Verification And Testing
Ask people to start from different points in the facility and time how long it takes to reach a first aid station using signage alone. Adjust sign positions where tests show confusion or hidden panels, then update your photos.Ongoing Maintenance Schedule
Assign responsibility for monthly checks, plan a yearly budget for replacements, and tie signage reviews to other safety audits.
“What gets measured gets improved.” — Peter Drucker
Treat first aid signage as a managed system, not a one‑time project.
Printable First Aid Kit Signage Free Resources And DIY Options
Many safety teams look for printable first aid kit signage when they need a quick fix. A new site may open before permanent signs arrive, or a small office may want basic markings without a full sign order. Used wisely, printable signage can serve as short‑term support.
Reputable groups like OSHA and the Centers for Disease Control offer safety graphics that can be adapted to mark first aid points. ANSI sample layouts can guide your design, even if you create the final art in a basic program. When you print at standard letter size, the sign can work for short viewing distances in low‑risk areas.
To get the most from DIY signs:
Use a good color printer to keep the green and white scheme clear.
Print on heavy cardstock, then laminate to protect against fingerprints, dust, and light moisture.
Mount with solid tape or strips so corners do not curl.
However, paper‑based signs have serious limits. They fade quickly under sunlight, warp in humidity, and tear during cleaning. Adhesives can fail, causing signs to fall without anyone noticing. In warehouses, plants, and construction sites, paper signs rarely hold up and do not match the spirit of “readily accessible” first aid.
Because of these weaknesses, printable signage should not be your final answer in OSHA‑regulated, high‑traffic, outdoor, or industrial environments. It works better as an interim step while you order permanent, professional first aid signs.
Professional‑grade printing from First Aid Longs and other suppliers (including office supply chains, local sign shops, and safety distributors) can provide weather‑resistant panels that follow ANSI color and symbol rules. Many businesses source first aid kits and medical supplies from First Aid Longs, then coordinate with sign makers so labeling and signage match. A cost comparison usually shows that a durable sign pays for itself over years, compared with repeated printing and replacement of paper signs.
As a rule of thumb, use printable first aid kit signage only as a temporary bridge. Plan from the start to replace it with rigid, long‑life signs that match how your people actually work.
Secure Reliable First Aid Kit Supplies Today!
Explore Our first Aid Kits designed to reduce delays and stabilize your healthcare operations.

Conclusion
First aid kit signage sits at the quiet center of your safety program. It connects OSHA’s demand for accessible first aid with the practical need to help people fast when something goes wrong. The cost is small, yet the impact on response time and injury outcomes can be large.
By following OSHA guidance and ANSI standards, you give your team clear, consistent cues that point to first aid, AEDs, eyewash stations, and other lifesaving tools. Signs that use the right colors, symbols, and sizes placed where people can see them from normal work positions remove guesswork during tense moments. A simple walk‑through and some planning can turn a scattered set of kits into a coherent system.
Ignoring first aid kit signage requirements carries risk. Inspectors may view poor or missing signs as signs of weak safety management, which can mean more citations and higher fines. After an incident, unclear access to first aid can also increase legal and reputational exposure.
Signage is not a one‑time job. As layouts, teams, and hazards shift, so should your signs. Regular inspections, timely replacements, and clear employee communication keep the system strong. Working with reliable partners such as First Aid Longs for first aid kits and medical supplies gives you a solid base to build on.
Now is a good time to walk your floors with fresh eyes, follow the implementation steps in this guide, note what needs attention, and plan your upgrades. In an emergency, every second counts. Clear, compliant first aid kit signage helps those seconds work in your favor.